Remix is an exciting framework released by the creators of React Router.
Despite only being open-sourced on 22 November 2021, it has exploded in popularity and interest. In the state of frontend 2022 survey, it was the 2nd most popular framework that developers wanted to learn in the future.
But what is it, and why has it generated so much hype?
In this post, we’ll take a tour of Remix and explore its fundamental features.
Remix is a Meta-Framework
The most common description of Remix is that it is a React meta-framework. It’s common to see Remix compared to others, like Next.js or Gatsby.
React is very good for building user interfaces - rendering the elements on a page, updating them efficiently, etc. However, frontend development involves a lot more than creating the UI.
On their site, Next.js describes several Building Blocks of a Web Application. These include:
- User Interface - how users will consume and interact with your application.
- Routing - how users navigate between different parts of your application.
- Data Fetching - where your data lives and how to get it.
- Rendering - when and where you render static or dynamic content.
- Performance - how to optimize your application for end-users.
- Developer Experience - your team’s experience building and maintaining your application.
React is unopinionated when it comes it the majority of those blocks. It’s up to the developer to decide how to implement them.
Meta frameworks provide tools to solve common app requirements so developers can focus on creating great user experiences.
Remix is a Super-Charged Router
Now that I’ve described Remix as a meta-framework, take that definition and put it in the back of your mind.
Comparing Remix to other meta-frameworks is useful, but I’ve noticed that’s not usually how the Remix team introduces Remix.
The founders and creators of Remix, Ryan Florence and Michael Jackson, are also the creators of React Router. Here’s how they describe Remix:
We’ve always thought of Remix as “just a compiler and server for React Router”.
— Ryan Florence, Remixing React Router
[Remix is] like React Router plus… it’s like React Router taken to the next level.
— Michael Jackson, Chats With Kent C. Dodds, S4:EP10
Kent C. Dodds, the director of developer experience at Remix, introduced Remix as:
“[Remix] is basically like v7 of React Router. It’s like an upgrade of React Router that supports server rendering. It’s a compiler.”
— Kent C. Dodds, Shipping to the Edge
How does a routing library turn into a meta-framework? To answer that, let’s start by looking at routing in Remix.
Routing
Routing is possibly the most important concept to understand in Remix.
— Remix docs
In Remix, routes are created by adding files to the app/routes/ directory. For example:
app
├── root.tsx
└── routes
    ├── index.tsx
    ├── login.tsx
    └── notes.tsx
This will create three routes:
www.example.comwww.example.com/loginwww.example.com/notes
Simple enough. So therefore, app/routes/notes/new.tsx defines the /notes/new page, right?

Nested routing
Nested routing comes from the idea that routes can be mapped to segments of the URL.
For example, take a look at the example below.
The Root component maps onto the root URL, www.example.com. This is the UI that will be common across all routes. In this case, that’s the navigation sidebar. The route then leaves a hole, using an Outlet component, which is filled by child routes.
This pattern continues down the URL tree:
- Each segment of the URL corresponds to a route.
- Each route defines the UI that is common across all URLs that include that route.
Remix can optimise navigation because if a route is persistent across the two URLs, Remix doesn’t need to rerender those components. Only the section of the UI that needs to change is updated.
It’s not just the UI that can be mapped to nested routes. They can also be mapped to data dependencies, actions, and even specific styling.
Nested routes are an incredible way to not only segment and organise your code, but also allow Remix to optimise it in ways that wouldn’t otherwise be possible.
For example, when navigating, Remix only needs to fetch the data for the routes that are changing. If a route is common between the two URLs (e.g. the root route), Remix doesn’t need to refetch that data, because it already has it.
Nested routes make possible and magnify all other features of Remix.
Bridges the Gap Between Frontend and Backend
In his post, Remix: The Yang to React’s Yin, Kent C. Dodds refers to a network chasm that exists between the client and the server.

We have code that runs on the client and the server but there’s a gap between them. In order to run things in the client, we need to cross the chasm. But crossing the chasm is expensive. It takes a long time, which leads to loading spinners, and it leaves the developer to juggle asynchronous code.
Managing the chasm is hard. We typically over-fetch the data and filter it on the frontend. We cache it using React state. We try to co-locate the data fetching with the components that need them, which leads to render-fetch chains and longer load times. The process leads to difficult bugs and larger bundle sizes.
Enter Remix.
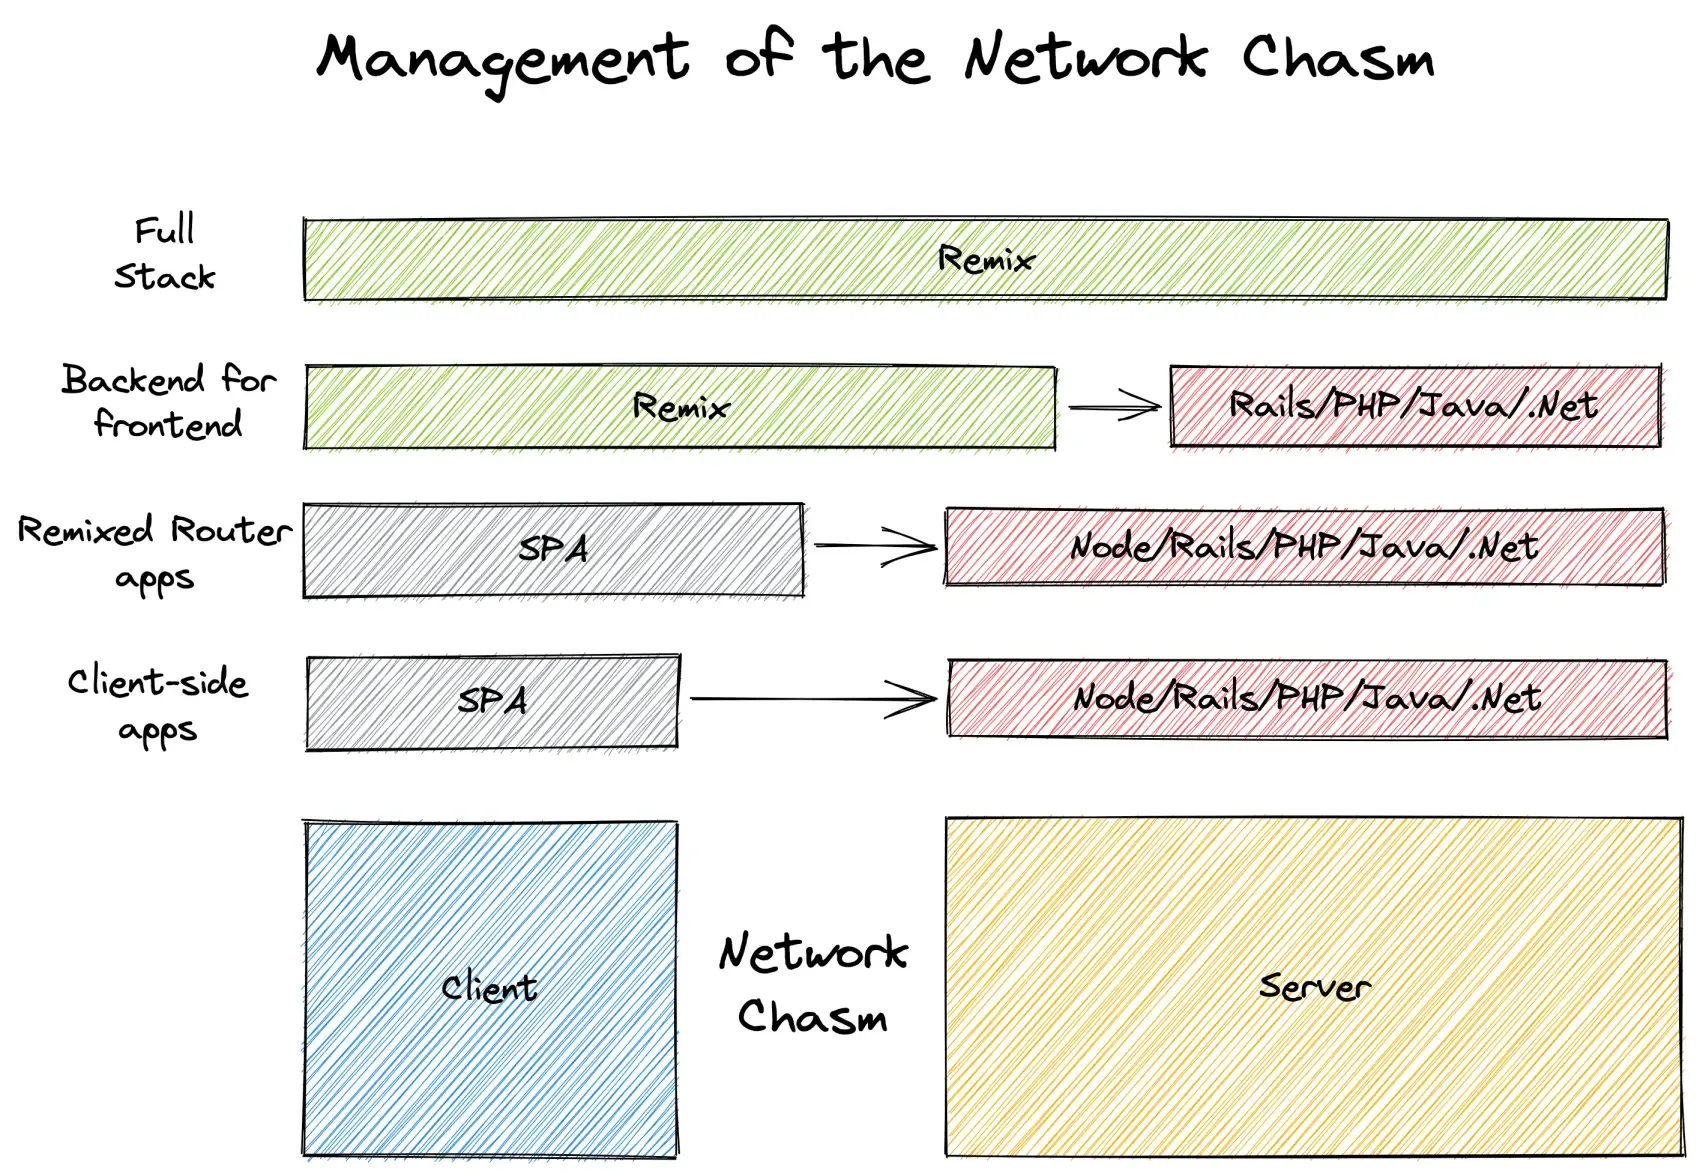
Remix crosses the chasm by letting you write frontend and backend code in the same file. This makes it incredibly easy to move code from the client to the server and only send what the client needs over the chasm.
Let’s take a look.
Loaders
Inside route files, you can define a loader. These are run on the server when it receives the initial request for the route.

Any data returned by the loader will be available in our component by using the hook useLoaderData. This means we can move our data fetching to the server and it will be initiated as soon as the request reaches the server.
Let’s take a look at an example.
import type { LoaderFunction } from "@remix-run/node";
import { json, redirect } from "@remix-run/node";
import { useLoaderData } from "@remix-run/react";

import { getUserId } from "~/session.server";
import { getName } from "~/models/user.server";

type LoaderData = {
  name: string;
};

export const loader: LoaderFunction = async ({ request }) => {
  const userId = await getUserId(request);

  if (!userId) {
    throw redirect('/login');
  }

  const name = await getName({ userId });
  return json<LoaderData>({ name });
};

export default function Route() {
  const data = useLoaderData() as LoaderData;

  return <div>Hello {data.name}!</div>;
}
Our route file has two exports:
- The
defaultexport is the component that will be rendered at this route. - The
loader.
When a request for this route is made, the loader is called by the server.
The request parameter is not a Remix abstraction but a Request object from the Fetch API. This is a big part of Remix’s philosophy - use the native web as much as possible. By learning Remix, you’re also going to accidentally learn how to use the web. You’ll be a better front-end developer, even if you choose to use something else in the future.
We can check the request for cookies to see if the user is currently logged in (getUserId). If they’re not, we can throw a redirect, which will redirect the user to the login page.
In loaders (and actions), we can just focus on the happy path. If there’s a problem, we can just throw an error (or a response) and Remix will take care of the rest!
Once we have the userId, we get the user’s name and return it as json.
Inside our component, we call useLoaderData which will give us the data we returned in our loader. Simple!
Loaders give us three main benefits:
-
Simple data loading
Components no longer need to worry about loading states, error states, or where the data is coming from.
They just call
useLoaderDatato access the data. The rest is handled by Remix. -
Ship less to the client
Loaders run on the server so we can run the code to fetch the data, validation, etc. without sending any of the code to the client.
-
Parallel data requests
Remix doesn’t need the component to render to know what data should be requested. It knows what is needed just by looking at the URL.
This means Remix can make all the necessary network calls in parallel rather than sequentially.
This removes the artificially delayed load time that comes in a typical client-rendered app.
In fact, Remix can even use this to prefetch data for routes before a user even clicks a link, making navigation super snappy.
Forms and Actions
Remix also lets you simplify and optimise data mutations.
By data mutations, I mean non-GET requests (POST, PUT, PATCH, DELETE). These will typically be sent from forms, which are to Remix what Sith Lords are to Obi-Wan Kenobi.

Let’s take a look.
import type { ActionFunction } from "@remix-run/node";
import { json, redirect } from "@remix-run/node";
import { Form, useActionData } from "@remix-run/react";

import { subscribeEmail } from '~/models/newsletter.server';
import { validateEmail } from "~/utils";

interface ActionData {
  errors?: {
    email?: string;
  };
}

export const action: ActionFunction = async ({ request }) => {
  const formData = await request.formData();
  const email = formData.get("email");

  if (!validateEmail(email)) {
    return json<ActionData>(
      { errors: { email: "Email is invalid" } },
      { status: 400 }
    );
  }

  await subscribeEmail(email);
  return redirect('/success');
};

export default function NewsletterPage() {
  const actionData = useActionData() as ActionData;

  return (
    <Form method="post">
      <label htmlFor="email">Email address</label>
      <input
        id="email"
        name="email"
        type="email"
        aria-invalid={actionData?.errors?.email ? true : undefined}
        aria-describedby="email-error"
      />
      {actionData?.errors?.email && (
        <div id="email-error">
          {actionData.errors.email}
        </div>
      )}
    </Form>
  );
}
First, notice what we don’t have in our component.
- No local state for controlled inputs.
- No
onChangehandlers. - No
onKeyPresshandlers, to submit when enter is pressed. - No
onSubmithandlers (and noevent.preventDefault). - No local state for error messages.
- No local state for loading or submitting states.
There’s nothing stopping you from using any of these. But with Remix they become intentional choices to add a bit of JavaScript spice, rather than the default boilerplate for React forms.
Remix gives us a Form component, but there’s nothing Remix-specific about it. It’s a regular form element but upgraded with progressive enhancement.
Progressive enhancement is the goal of providing a functioning app to as many users as possible, while also providing each user with the best possible experience. It’s a huge part of Remix’s philosophy and they give us plenty of tools to take care of it for us.
In the case of Form, it will still send a POST request to the server even if the user doesn’t have JavaScript. This means users that either don’t have JavaScript or just have slow internet connections, will still be able to interact with our forms.
But if the user does have JavaScript, the form is enhanced to use fetch instead. This improves the UX, by not refreshing the page after the form submits, for example.
If there’s no onSubmit handler, what happens when our form submits?
When a Form submitsaction of the route that renders it. That means we’ve collocated our component, our data reads, and our data writes.
Once again, our action receives a Request object. We get the form data from the object in the normal way.
After we have the email address, we validate it. If there’s something wrong, we can return a response with an error message and an HTTP response status code. That’s all we need to do in our action when we encounter an unhappy path - we either return or throw a response and then carry on with the happy path. Remix handles the rest.
If we do return an error response, we can access it in our client by using the hook useActionData. We can then use this to show the error message to the user.
Finally, if the email is valid, we can subscribe the user to the newsletter and then redirect them to the success page.
What Now?
Remix makes developing frontend apps so much easier by taking care of the network chasm for us. Data loading and writing become simpler and server caching in local state becomes less vital. More code is moved to the server so the client only downloads what it actually needs.
We’ve only been able to scratch the surface of Remix here. If you want to get hands-on and give it a try, I highly recommend the Jokes tutorial in the Remix docs. It covers all the basics you need to know to use Remix.
If you have any Remix questions or requests for future posts, feel free to send me a message on Twitter.